Do you have a GM vehicle between 1980 to 1995? If so, there is a big chance your car has an OBD1 connector (ALDL).
This connector is unique and applies to Pontiac, Chevrolet, GMC, Oldsmobile, Cadillac, and Buick, and more. The positive thing with the OBD1 connector is you can read your trouble codes at home without any diagnostic tools.
There are special diagnostics tools for this kind of connector, but they are not necessary as you can read them just as well without a tool.
If you have a newer car after 1996, you have OBD2 codes in your vehicle and this article will not apply to your car. You can check our other article with OBD2 codes.
OBD1 Trouble Code List
Here is a complete OBD1 trouble code list. The OBD1 codes' meanings can differ a bit depending on what car model you have, but most of them are the same among all car manufacturers. We do not take responsibility for any faults in this code list. Check your repair manual for the trouble codes of your car model.
| Code | Description |
|---|---|
| 12 | System OK ( Diagnosis mode active ) |
| 13 | Oxygen O2 Sensor – Circuit open/no activity |
| 14 | Coolant Temperature sensor – Resistance too high or shorted circuit |
| 15 | Coolant Temperature Sensor – Circuit low or open |
| 16 | Direct ignition system (DIS) – Faulty circuit / shorted circuit |
| 17 | Camshaft Position Sensor – Circuit/timing error |
| 18 | Camshaft or Crankshaft – Sensor/circuit/timing error |
| 19 | Crankshaft sensor – Sensor/circuit/timing error |
| 21 | Throttle position sensor – Out of range/Performance |
| 22 | Throttle position sensor – Low Voltage |
| 23 | Intake Air temp sensor – Out of range, low resistance |
| 24 | Vehicle speed sensor – Circuit fault |
| 25 | Intake Air temp sensor – Out of range, high resistance |
| 26 | QDM A ( Quad-driver module ) – Circuit #1 fault |
| 27 | QDM A ( Quad-driver module ) – 2nd gear circuit |
| 28 | QDM A ( Quad-driver module ) – Circuit #2 fault |
| 29 | QDM A ( Quad driver module ) – 4th gear circuit |
| 31 | Wastegate solenoid – Circuit fault |
| 32 | EGR ( Exhaust Gas Recirculation ) – Circuit fault |
| 33 | Manifold Air Pressure Sensor – Signal out of range, high resistance |
| 34 | Manifold Air Pressure Sensor – Signal out of range, low resistance |
| 35 | Idle air control valve / Sensor – Circuit fault |
| 36 | Ignition system – Circuit error/fault |
| 38 | Brake input ( Brake switch sensor ) – Circuit fault |
| 39 | Clutch input ( Clutch sensor ) – Circuit fault |
| 41 | Camshaft sensor – Circuit fault or ignition control – circuit fault/error (depending on the car model) |
| 42 | EST (Electronic spark timing) – Circuit grounded/shorted |
| 43 | Knock sensor / Electronic spark control – Circuit fault error (depending on the car model) |
| 44 | Oxygen O2 sensor – Lean Mixture |
| 45 | Oxygen O 2sensor – Rich Mixture |
| 46 | Pass-key II – Circuit or Power steering pressure switch – circuit fault error (depending on the car model) |
| 47 | PCM data – Circuit error |
| 48 | Misfire (diagnosis) |
| 51 | Calibration error – Mem-cal, ECM, or EPROM failure |
| 52 | Engine oil temperature circuit – Low temperature indicated / circuit error |
| 53 | Battery voltage – Low/high/error or Egr valve solenoid 1 – circuit error (depending on the car model ) |
| 54 | Fuel Pump – Circuit error or Egr valve solenoid 2 – Circuit error (depending on the car model ) |
| 55 | ECM PCM – Circuit error or EGR valve solenoid 3 – Circuit error (depending on the car model ) |
| 56 | Quad-driver module (QDM B) – Circuit error |
| 57 | Boost control – Error / Faulty |
| 58 | Vehicle anti-theft system ( VATS ) – Circuit faulty |
| 61 | AC (Air conditioning) system performance or degraded oxygen sensor signal (depending on the car model) |
| 62 | Engine oil temperature sensor – High temperature indicated |
| 63 | Oxygen O2 sensor right side – Circuit open or MAP (manifold air pressure sensor ) – out of range (depending on the car model ) |
| 64 | Oxygen O2 sensor right side – Lean mixture indicated |
| 65 | Oxygen O2 sensor right side – Rich mixture indicated |
| 66 | A/C (Air conditioning ) pressure sensor – Circuit low pressure |
| 67 | A/C (Air conditioning ) pressure sensor – Circuit or a/c clutch – circuit failure (depending on the car model) |
| 68 | A/C (Air conditioning ) compressor relay – Circuit failure error |
| 69 | A/C (Air conditioning ) clutch – Circuit/pressure high |
| 70 | A/C (Air conditioning ) refrigerant pressure – Circuit high |
| 71 | A/C (Air conditioning ) evaporator temperature sensor – circuit low |
| 72 | Gear selector switch – Circuit error/fault |
| 73 | A/C (Air conditioning) Evaporator temperature – Circuit high |
| 75 | Digital EGR #2 – Solenoid error/faulty |
| 76 | Digital EGR #3 – Solenoid error/faulty |
| 77 | Digital EGR #1 – Solenoid error/faulty |
| 79 | Vehicle speed sensor (SS) – Circuit signal high resistance |
| 80 | Vehicle speed sensor (VSS) – Circuit signal low resistance |
| 81 | Brake input data – Circuit faulty |
| 82 | Ignition control (IC) 3X – Signal error/faulty circuit |
| 85 | Prom – Error/faulty circuit |
| 86 | Analog/digital – Pcm error /faulty circuit |
| 87 | Eprom – Error / faulty circuit |
| 99 | Power management – Error / faulty circuit |
OBD1 Connector Location
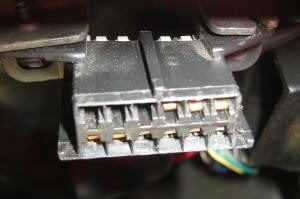
The OBD1 connector is usually located under your steering wheel, under the dash. The connector may have a black plastic cover, which you have to remove before accessing it. The connector is often black and has 12 pins on it; pretty easy to identify.
Check the image above to see what an OBD1 connector looks like
OBD1 Connector Wirings Pinout
The OBD1 connector has 12 pins, but not all of them are used in most car models. The standard pins like the ground, power, and a diagnostic pin are the same in most car models though.
Make sure you connect your wires correctly, as if you are not careful, it may damage your vehicle's electrical system and control units, which can be very expensive.
This is how the pinout of the OBD1 connector looks like in most car models, check your repair manual for the exact pinout:

- A = Ground
- B = Diagnosis Terminal
- C = A.I.R
- D = Service engine soon light
- E = Serial Data
- F = T.C.C
- G = Fuel pump
- H = Brake Speed input
- J = None
- K = None
- L = None
- M = Serial Data
RELATED: ELM327 Bluetooth Pin/Key Code
How to Read OBD1 Codes at Home
Our reading method without a diagnostic tool is to make short the circuit of pin A and pin B. The car will then enter the diagnostic mode and flash the "check engine Light" several times, and we should count the flashes to figure out the diagnostic codes.
How to read the OBD1 codes:
- Always connect a car battery charger to your car when doing any electrical work that requires the ignition to be on. Low voltage can cause a lot of trouble with the troubleshooting and many error codes that we do not want.
- Put a jumper wire between PIN A and PIN B.
- Let the jumper wire sit there and turn the ignition to ON. Do not start the engine.
- The check engine light will begin to flash. Count the flashes. There will be a longer pause between the codes if you have several trouble codes and a shorter pause between the trouble codes' digits. For example, code 16 = 1 flash * Pause * 6 flashes.
- When all trouble codes are outputted, it will flash the code 12 – 1 flash * Pause * 2 flashes.
- Write down all the trouble code numbers you got and check the trouble code table further down in the article.
- Remove the jumper wire and car battery charger.
OBD1 Code Reader
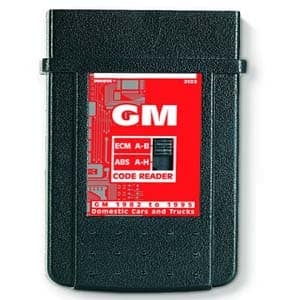
There are also a lot of OBD1 code readers on the market to make the job easier. With an OBD1 code scanner, you do not have to short the connector, and you do not have to count the flashes on the dashboard.
You will get the problem in clear text on your device, and this is, of course, a great investment to make if you are reading a lot of trouble codes from older vehicles.
There are several different code scanners on the market in all different price ranges. Some scanners can read both OBD1 and OBD2 codes, but these are pretty expensive. One really affordable scanner that I found is the Innova 3123. You have two different options, Ford or GM vehicles, you can choose from. If you want to take a further look at the scanner, you can find it here on Amazon:

INNOVA 3123 GM OBD1 Code Reader
- Safely accesses the on-board computer to...
- Works on most General Motors domestic...
- Connects to your vehicle's computer...
- Will not harm the vehicle's computer...
Source: https://mechanicbase.com/trouble-code/obd1-codes/
Posted by: arliearliesuchearskiea0252089.blogspot.com
